If you haven’t been here before, I would like to say Welcome! I am super excited you are here, and even more excited that you love crafting! Today I am answering some of the most common Cricut questions for beginners about Cricut tools, crafts, and giving some tips and personal recommendations.
So, when I first got my Cricut Explore Air 2, I had no clue how to use it. I made 50,000 trips to Michaels for supplies, tools, materials…you name it I was buying it. Eventually, I got to the point where I could sit down at any point and make a craft without having to leave to get stuff. When I started my research I really had a hard time understanding all the procedures and dialect that was being used on the Cricut website, the tutorials, and other blogs I read.
My purpose behind this post is to give you all the terms, and EVERY single step on how to use your tools, your Cricut machine, and some other tips and tricks related to materials. There are links throughout to see other posts that are AWESOME resources with FREEBIES too!
By the way, this is written for beginners, so if you are seasoned, stick around anyway because I have some hacks and secrets to make your life easier!
Just so you know, I have written this in baby steps to try to diffuse some of your frustration. I too wanted to throw the Cricut away after about a week because the learning curve, and because I was so new to everything.
One last thing and we will get started. DO NOT THROW AWAY YOUR CRICUT, LOL.
Introduction To the Cricut Explore Air 2 For Beginners
What all can the Cricut Explore Air 2 do?
I am so glad you asked! The options are really endless if you have a Cricut, a computer, and a printer. Below are the functions for the Cricut Explore Air 2
- Cutting
- Writing
- Print and Cut
So the most common function is that it is a cutting machine. It cuts all kinds of materials depending on what you design in Design Space, including paper, cardstock, some wood, vinyl, stencil sheets, etc..
It can also write for you! Which is perfect for making handmade cards. I have written this to die for post about what pens you can use and some hacks I have learned along the way.
There is a function called print and cut, so you can print on your home printer then the machine can cut the exact lines out. Read more about there here to master that skill.
What does the dial do?
You will set the dial depending on what type of material you are using. For the most part, it is pretty straightforward. There are some instances that the Cricut will “eat up” your paper or vinyl. With that being said, or if it has happened to you find out what I do to fix it. There is also a custom setting, if you turn the dial to custom, you will then select the material from the Design Space area (on screen).
What materials can the Cricut cut?
This is an awesome question! Here is a whole list of materials! This list also includes what type of blade you will need to cut with. If you would like to know the actual pressure settings you can see the full table here.
What is Design Space?
Cricut Design Space is where are the magic happens. This is a plugin you will install and where all your projects will be made and stored (to your account online). After you unbox your Cricut view this page to install your plugin if you haven’t already. It will prompt you to sign in using your account information and redirect you. If you don’t have an account, click to sign up, then follow instructions. DO NOT forget your subscription to Cricut Access.
What is Cricut Access?
Cricut Access is a monthly subscription service that Cricut provides to allow you to use fonts, projects, and images. This is a MUST. There are 3 different plans to choose from and you will not be sorry!! All of the images are in the format needed to do what they are designed for whether it be cut, print, or write. This makes it extremely easy to make projects, especially for beginners! I still have this subscription and would not go without it! I LOVE it so much, I dedicated a WHOLE post to it, so you can get ALL the details! See the link below, and just a secret, there’s a FREE download for you!
Related: What is Cricut Access? Why You Need This Now!
Cricut Tool and Accessory Questions
If you would like the Cricut Tool Starter kit, you can get that here! It’s absolutely awesome and has all the essential tools you need to start crafting. This is what I have as well!
What is a scoring stylus? How is it used?
A scoring stylus is a tool used to make “lines” that are easier and more accurate to fold, like when you are making a card or envelope. To engage the tool, you will slide it into “port” A on your Cricut (be sure to push somewhat firmly so it clicks in place, the press the latch back to tighten it). Your port B will always have a blade in it. Port A is also shared with pens when using the writing function. Also, the score on the paper is an indention, so there will not be a written mark of any kind.
Why would I need tweezers?
If you haven’t seen this, I will say again I prefer to use the Cricut tweezers when I roll paper flowers versus using them on tedious parts of a design. The reason being, the ends are not very sharp and they have a little resistance making it harder than what it should be to pick up small items. The Cricut brand tweezers do work better with paper crafts in my opinion, but many of my projects are vinyl. Vinyl is sticky, so I really need an accurate set to pick up small intricate details (like the dots over I’s).
Do I really need the Cricut brand scissors?
Truthfully, not necessarily. However, I will say the tip is very sharp which is good in some cases. Also, they are smaller and easier to maneuver on smaller detailed projects. Plus, if you purchase the starter kit, you might as well get them. The starter kit is awesome! It has all the essentials to get you one step closer to completing your craft project. If you prefer standard craft scissors, I love this brand!
What is the scraper for?
The scraper is used to burnish materials. By burnish, I mean to transfer material (if needed) and to also smooth your material to your mat firmly. If the material is wrinkled or loose, sometimes the Cricut machine has a hard time cutting, resulting in ruining your project. There is a small, standard one that comes in the starter kit, but there is also, an extra large. This is optimal with larger projects, especially large sheets of vinyl, the XL is my go to. You may also use these to help clean your mats!
Will I ever use this spatula?
Yes! Many times, especially with brand new mats, cardstock and certain types of vinyl have a bad habit of sticking to the mat. This causes rips in the paper and a big mess on your new mat. At this point, the easiest way is to use the spatula to remove it.
Also, certain designs and lettering made from cardstock may stick to the mat, rather than coming off with the paper. Chances are this is the part of the design you need for your project.
Carefully ease the spatula under the lettering while pulling the mat away from the design or letters. If you try to get them off without peeling the mat back you may ruin your project.
How do I know what Cricut mat to use?
This is a tough one. Brand new mats are super sticky and are a dream to work with. Unfortunately, they usually don’t stay clean for long. Cricut has a guideline of which mat to use depending on the material you are working with. But, once the “sticky” is gone after many uses, I have a bad habit of using whatever I can. So, to save you some heartache, I have written a whole post on mats (FREEBIE ALERT: There is a mat guide for you to download). That means this is a very important subject, so you MUST read!!
By the way, for your machine to do ANYTHING, you have to use a mat. Well at least I do! I have seen some people online saying that they use theirs without a mat, but I don’t recommend it.
What is transfer tape used for?
Some projects required materials to be transferred before it can be finished. Specifically, vinyl and stencil projects. This can be confusing when reading, so I have put together a FREE guide for you. This shows you visually and with text exactly what I am talking about. There are different types of transfer paper including how tacky they are and they could be clear or have a masking tape appearance both work well.
What are the differences in the Cricut blades?
There are 2 types of blades for the Air 2, a standard blade which is what comes with the machine and the deep cut blade. The standard blade is what you will most likely use 90% of the time. The Deep cut blade is used for thicker materials such as wood.
Don’t forget if you are purchasing a deep cut blade for the first time you will need the housing as well!
There are different housings for each version of the Cricut, so prior to purchasing be sure to double check it is compatible with your machine.
How do you change the pens?
The pen will always go in Port A. There is a latch on the outside that has to be opened. After you open it, you hold the port, and press the pen down in and simply latch it back. You are now ready to write with your Cricut.
Related: See this post for in-depth details specifically for tools and accessories
Cricut Craft Project Help
How do you make vinyl projects with the Cricut?
The machine will cut the vinyl as it would paper, the only difference is you have to transfer your design on whatever product you are cutting it on. Check this out to learn about different types of vinyl and how to use it.
How do you write with the Cricut?
After you have finished your design in Design Space, you will want to make sure that it is set to write, versus cut or print. Simply change or insert the pen in Port A and latch securely. Afterward, you will just click the flashing Cricut button and TA-Da!
That was a super easy answer! But I know this can be quite complicated. So I have written a detailed post here, with a FREE project just for you to get started with! There is a FULL visual tutorial as well. Your welcome!
Can any pen be used with the Cricut?
Yes! You will see conflicting opinions on this. I love Cricut pens and if you have them it is definitely easier to use those, but in some instances, I want to use markers or something else. You will need to purchase an adapter for your machine, OR you can buy some cheap pencil grips and get started!
Where is the best place to buy vinyl?
If you are in a hurry obviously the local craft stores are your best bet. If you have a little bit of time even as little as 2 days, you can shop at Amazon. They have some great deals, BUT be sure to read the FULL description prior to purchasing. There are all kinds of different vinyl and brands. There are also coupons and sales over at Cricut. If you sign up you will get $10 off of $50, how great is that!! One of my other favorite places is Expressions Vinyl.
Related: Check out this post if you need to learn more about the different types of vinyl
What all do I need for heat transfer projects?
You will need heat transfer vinyl, an iron or heat press (which I highly recommend), and a Teflon sheet. Click over here to see a tutorial on one of my heat transfer projects. The links above are products that I use for EVERY heat transfer project I do!
What is weeding?
Weeding is the process of taking away the material you DON’T want in your design. There are different weeding techniques and a special tool to do this! Become a master at weeding after reading this article!
What is the difference in regular vinyl and permanent vinyl?
This is asked ALL the time. There are several differences and different brands that I like better than others. This is such a big topic and lots of new terms, so I dedicated a whole post to that! AND a FREE download so, don’t forget to score that!
How do you use print and cut?
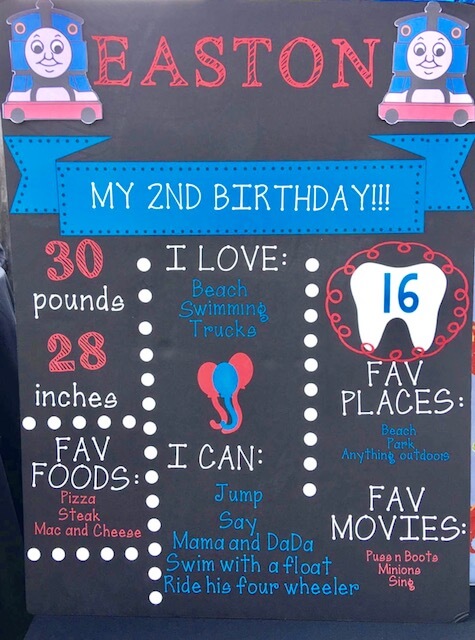
Awesome question! So the purpose of print and cut is to print an image or words from your printer. Then you will run it through the Cricut, it then cuts out whatever the image is.
For example, I made a Thomas the Train themed birthday board. I needed trains for the corners but did not want each detail cut out. So I uploaded the image to DS, chose the print and cut option. Printed through my inkjet printer. Then put the project on the Cricut mat, and let it cut around the outside. To help with understanding, I have written a whole post on this as well. It also includes a STEP by STEP tutorial with pictures!
Alright beginner crafter, you have the foundation to get started on your first project! I would love to see your creations, you can always post those in the comment section. AND if you need additional help please feel free to use the contact form and send me an email or again you can comment below!
XOXO
Happy Crafting! 🙂